> ## Documentation Index
> Fetch the complete documentation index at: https://docs.overcut.ai/llms.txt
> Use this file to discover all available pages before exploring further.
# MCP Catalog
> Browse and install pre-configured MCP servers from the open-source catalog with guided setup.
Install MCP servers in your Overcut workspace with one click using the **MCP Catalog**: a curated, open-source collection of pre-configured server definitions. The catalog is designed for MCP-based connections, usually when you want to bring third-party systems into Overcut that do not have native workspace support. Each catalog entry includes the server configuration, required secrets, and a recommended tool set, so you can go from discovery to a working integration without writing JSON by hand.
For first-class providers such as GitHub, GitLab, Azure DevOps, Jira, Linear, ClickUp, and Slack, most teams should start with native workspace integrations instead. Use the Integrations overview to choose the right connection path, and see the MCP Servers reference when you want to extend agents with external tools.
The catalog is powered by the open-source repository at [overcut-ai/overcut-mcp-catalog](https://github.com/overcut-ai/overcut-mcp-catalog). You can browse entries, suggest new servers, or contribute directly.
***
## What is the MCP Catalog?
The MCP Catalog is an in-app gallery of MCP server definitions. Overcut fetches the catalog from the [overcut-mcp-catalog](https://github.com/overcut-ai/overcut-mcp-catalog) GitHub repository and presents it as a searchable, filterable page inside your workspace. It is the standard way to add MCP-based access to external tools and unsupported systems, and it can also complement native integrations when your workflow needs extra tool coverage.
MCP servers in the catalog are provided by third parties. Configurations, tool sets, and APIs may change as providers release new versions. Always review the server's documentation and verify its authenticity before installing. Overcut does not guarantee the behavior, availability, or security of third-party MCP servers.
Each catalog entry defines:
* **Server configuration**: the JSON config Overcut uses to connect (command + args or URL + headers)
* **Required secrets**: credentials the server needs, with descriptions and help links
* **Recommended tools**: a curated subset of tools suitable for most use cases
* **All tools**: the full set of tools the server provides
***
## Browse the Catalog
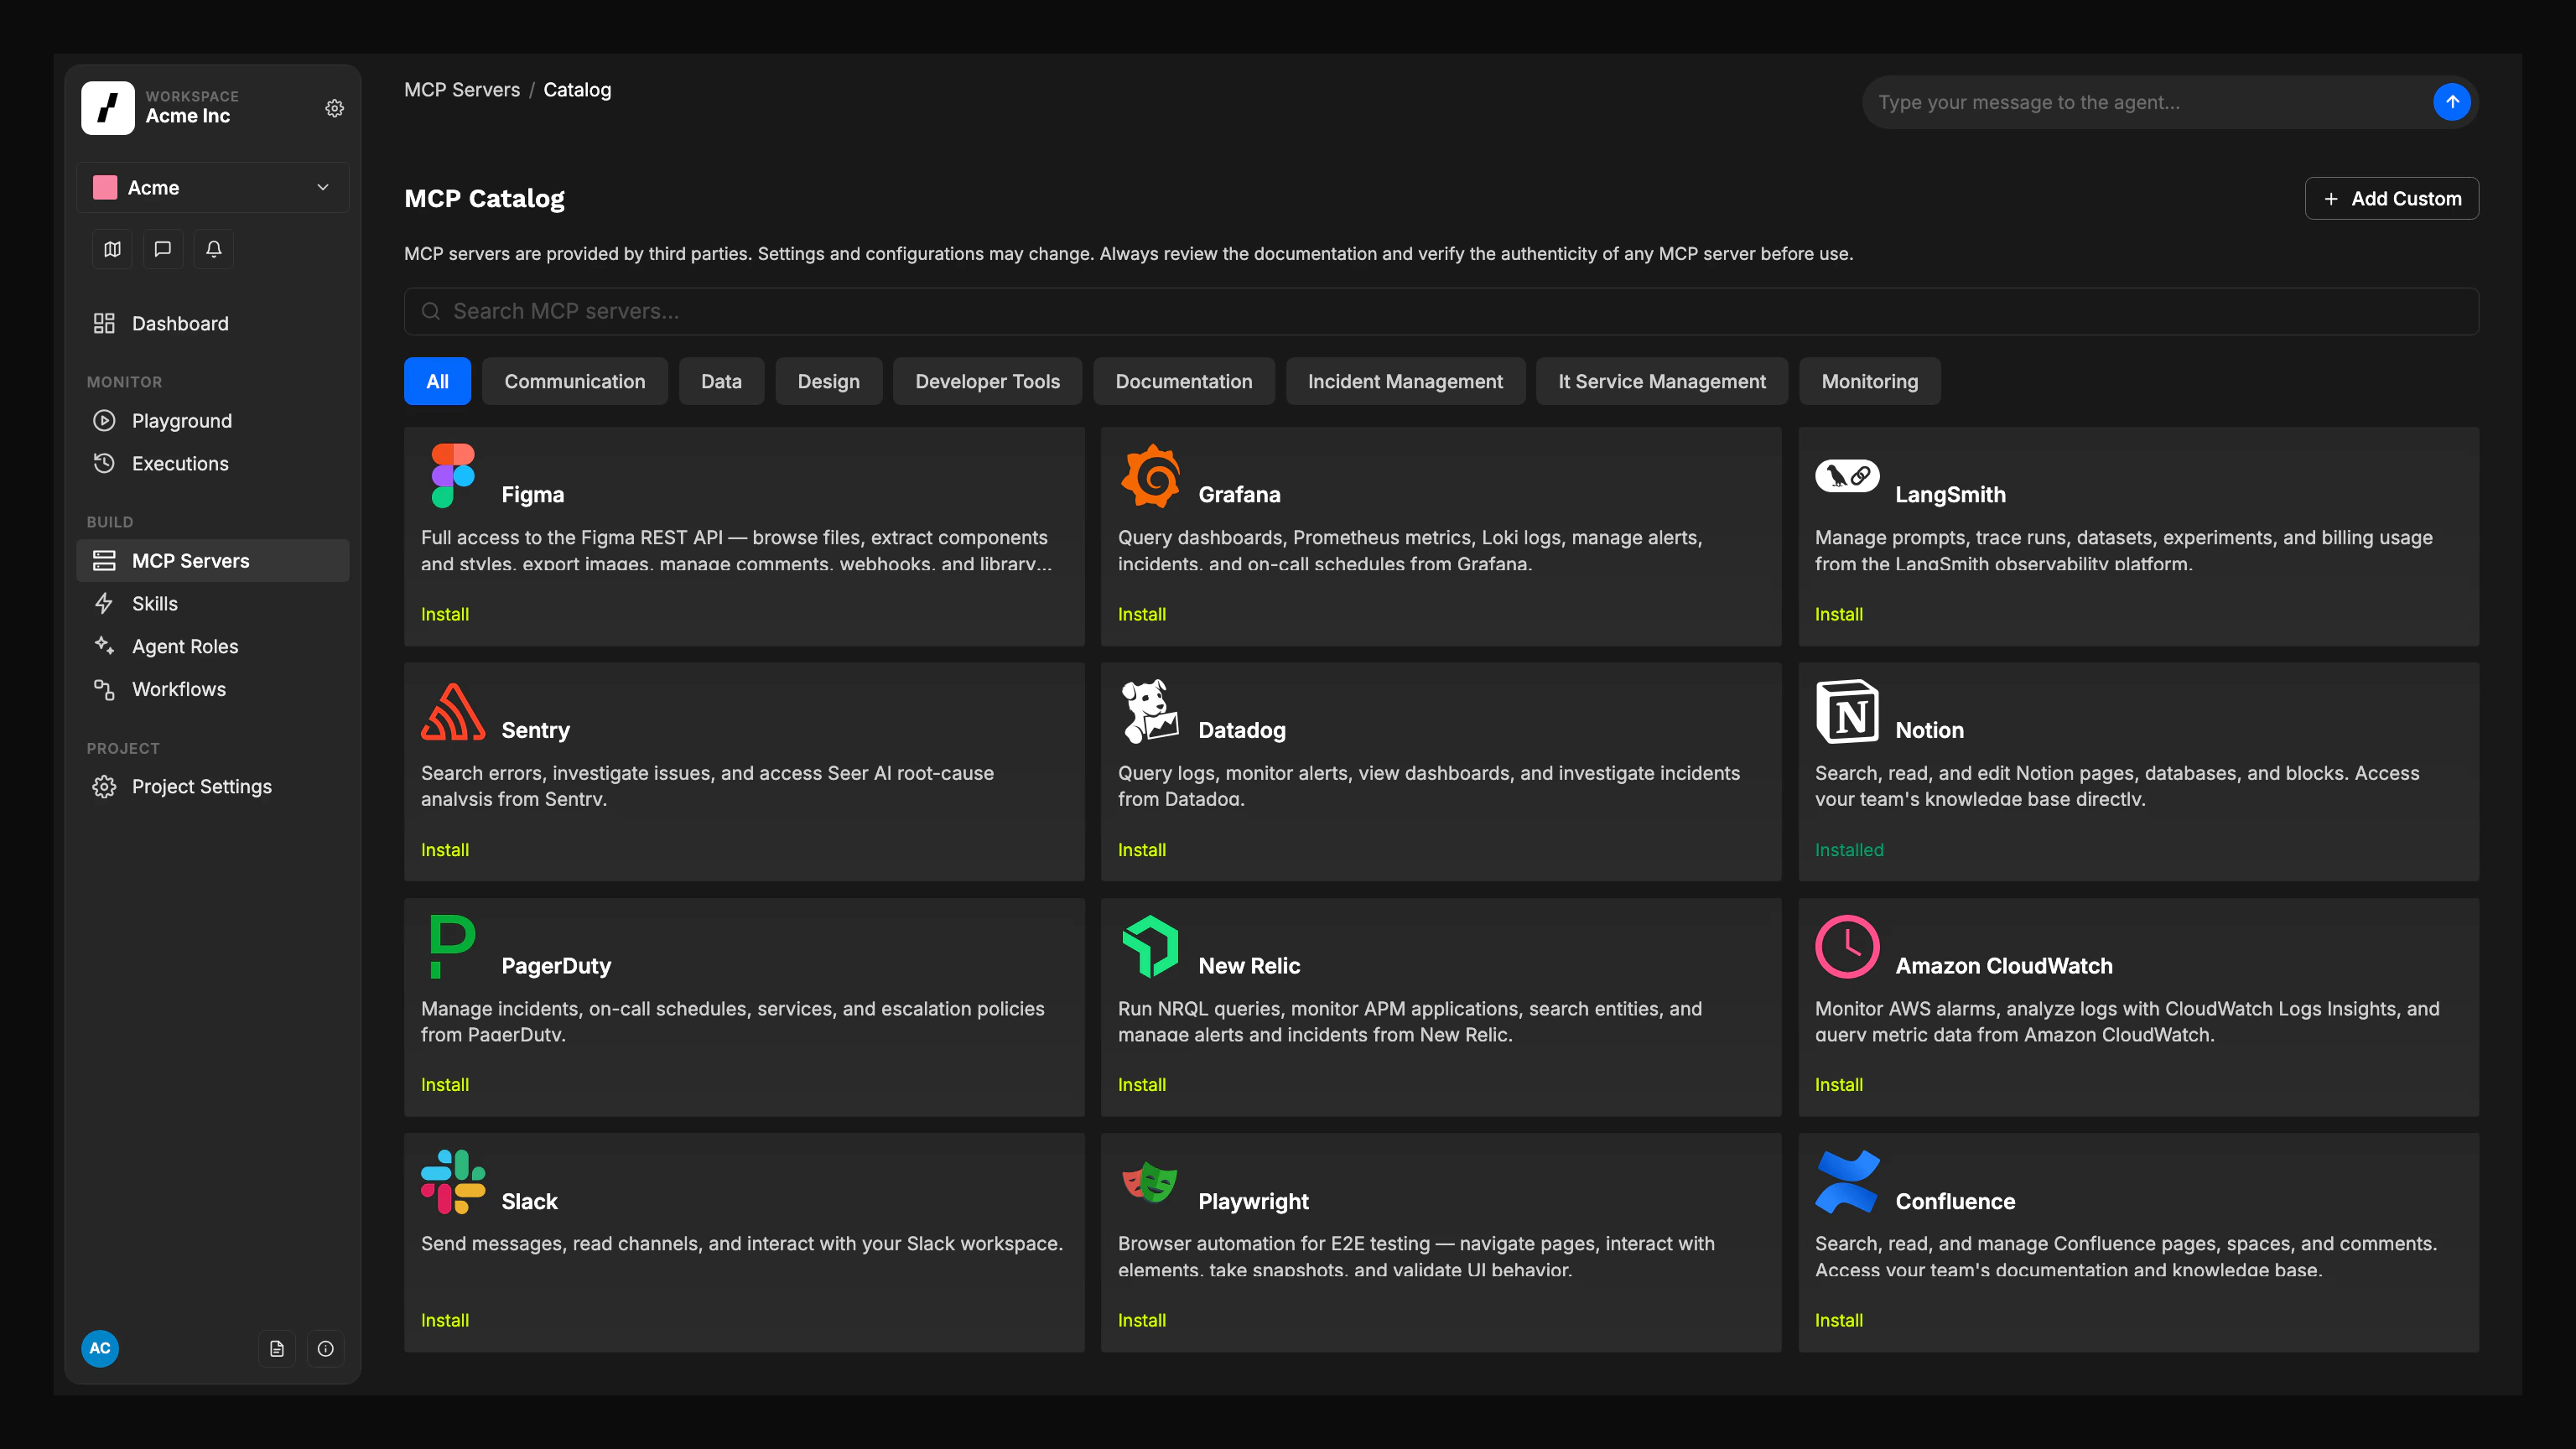 Navigate to MCP Servers in the sidebar and click Add MCP Server. This opens the catalog.
Use the search field to find servers by name or description. Use category filters to narrow results by use case (e.g. monitoring, design, documentation).
Each catalog card shows its status: Installed if the server already exists in your workspace, or Install if it hasn't been added yet.
If a server is already installed, you can go directly to [assigning it to an agent](/docs/reference/mcp-servers#assigning-mcp-servers-to-agents). If not, click the card to start the guided install flow.
***
## Install from the Catalog
Click a catalog card to open its install page. You'll see the server description, configuration preview, and setup inputs.
For each required credential, enter a new secret value, or (if the same credential already exists in your Vault) it will be detected and attached automatically.
Use the All Tools toggle to grant every tool, or leave it off to use per-tool checkboxes. Tools default to the catalog's recommended set. Toggle individual tools on or off as needed.
The install page shows a read-only preview of the server's JSON configuration. Verify it looks correct before proceeding.
Click Install MCP Server. Overcut creates the server and redirects you to its detail page so you can verify the setup immediately.
Reuse existing Vault secrets whenever possible. This keeps credentials consistent across MCP servers and simplifies future rotation.
***
## Split a Server Across Agents
You can install the same MCP server multiple times with different tool sets and assign each instance to different agents. This gives you fine-grained control over what each agent can do.
**Common patterns:**
* **Scoped access**: give a read-only Datadog instance to a triage agent (only log query tools) and a full-access instance to an incident responder (query + alert management tools)
* **Project isolation**: install the same Sentry server twice with different API keys so two agents monitor different projects independently
* **Least privilege**: limit each agent to only the tools it actually needs, reducing the risk of unintended actions
Keeping the tool set small helps the agent stay focused. Too many tools can slow down execution and lead to less accurate results. When in doubt, start with the recommended tools and add more only as needed.
***
## Add a Custom Server
If the server you need isn't in the catalog, click **Add Custom** in the top-right corner of the catalog page. This creates a blank MCP server entry and opens its detail page, where you can configure it manually. See the [MCP Servers reference](/docs/reference/mcp-servers#creating-a-custom-mcp-server) for the full manual setup flow.
***
## Contribute to the Catalog
The catalog is open source at [overcut-ai/overcut-mcp-catalog](https://github.com/overcut-ai/overcut-mcp-catalog). Each server is defined as a directory containing a `catalog.json` file.
### Repository structure
```
overcut-mcp-catalog/
sentry/
catalog.json # Server definition
icon.svg # Optional icon
figma/
catalog.json
icon.svg
...
```
### Catalog entry schema
Each `catalog.json` follows this structure:
```jsonc theme={null}
{
"name": "Sentry",
"description": "Search errors, investigate issues...",
"category": "monitoring",
"tags": ["errors", "debugging"],
"iconUrl": "https://raw.githubusercontent.com/.../icon.svg",
"websiteUrl": "https://github.com/getsentry/sentry-mcp",
"priority": 10,
"serverConfig": {
"command": "npx",
"args": ["-y", "@sentry/mcp-server@latest"],
"env": {
"SENTRY_ACCESS_TOKEN": "${SENTRY_ACCESS_TOKEN}"
}
},
"requiredSecrets": [
{
"envVar": "SENTRY_ACCESS_TOKEN",
"displayName": "Sentry Access Token",
"description": "Create an Internal Integration token...",
"helpUrl": "https://docs.sentry.io/..."
}
],
"recommendedTools": ["search_issues", "get_issue_details"],
"allTools": ["search_issues", "get_issue_details", "create_issue", "..."]
}
```
See the [CONTRIBUTING.md](https://github.com/overcut-ai/overcut-mcp-catalog/blob/main/CONTRIBUTING.md) for full guidelines on adding new entries.
### Create entries with AI
The catalog repository ships with built-in rules for popular AI coding tools (Claude Code, Cursor, Codex, Gemini). Clone it and use your preferred agent to generate new catalog entries:
```bash theme={null}
git clone https://github.com/overcut-ai/overcut-mcp-catalog.git
```
Ask your AI agent to create a new entry. It understands the catalog schema, secret conventions, and tool discovery patterns automatically.
***
## Next Steps
* **[MCP Servers Reference](/docs/reference/mcp-servers)**: Configuration reference, manual setup, allowed tools, and runtime behavior
* **[Vault](/docs/reference/vault)**: Manage the secrets referenced by MCP server configurations
* **[Agent Run Action](/docs/workflows/agent-run)**: Execute agents with MCP tools
* **[Overcut Playbooks](/docs/quick-starts/playbooks)**: Pre-built workflows you can import and customize
Navigate to MCP Servers in the sidebar and click Add MCP Server. This opens the catalog.
Use the search field to find servers by name or description. Use category filters to narrow results by use case (e.g. monitoring, design, documentation).
Each catalog card shows its status: Installed if the server already exists in your workspace, or Install if it hasn't been added yet.
If a server is already installed, you can go directly to [assigning it to an agent](/docs/reference/mcp-servers#assigning-mcp-servers-to-agents). If not, click the card to start the guided install flow.
***
## Install from the Catalog
Click a catalog card to open its install page. You'll see the server description, configuration preview, and setup inputs.
For each required credential, enter a new secret value, or (if the same credential already exists in your Vault) it will be detected and attached automatically.
Use the All Tools toggle to grant every tool, or leave it off to use per-tool checkboxes. Tools default to the catalog's recommended set. Toggle individual tools on or off as needed.
The install page shows a read-only preview of the server's JSON configuration. Verify it looks correct before proceeding.
Click Install MCP Server. Overcut creates the server and redirects you to its detail page so you can verify the setup immediately.
Reuse existing Vault secrets whenever possible. This keeps credentials consistent across MCP servers and simplifies future rotation.
***
## Split a Server Across Agents
You can install the same MCP server multiple times with different tool sets and assign each instance to different agents. This gives you fine-grained control over what each agent can do.
**Common patterns:**
* **Scoped access**: give a read-only Datadog instance to a triage agent (only log query tools) and a full-access instance to an incident responder (query + alert management tools)
* **Project isolation**: install the same Sentry server twice with different API keys so two agents monitor different projects independently
* **Least privilege**: limit each agent to only the tools it actually needs, reducing the risk of unintended actions
Keeping the tool set small helps the agent stay focused. Too many tools can slow down execution and lead to less accurate results. When in doubt, start with the recommended tools and add more only as needed.
***
## Add a Custom Server
If the server you need isn't in the catalog, click **Add Custom** in the top-right corner of the catalog page. This creates a blank MCP server entry and opens its detail page, where you can configure it manually. See the [MCP Servers reference](/docs/reference/mcp-servers#creating-a-custom-mcp-server) for the full manual setup flow.
***
## Contribute to the Catalog
The catalog is open source at [overcut-ai/overcut-mcp-catalog](https://github.com/overcut-ai/overcut-mcp-catalog). Each server is defined as a directory containing a `catalog.json` file.
### Repository structure
```
overcut-mcp-catalog/
sentry/
catalog.json # Server definition
icon.svg # Optional icon
figma/
catalog.json
icon.svg
...
```
### Catalog entry schema
Each `catalog.json` follows this structure:
```jsonc theme={null}
{
"name": "Sentry",
"description": "Search errors, investigate issues...",
"category": "monitoring",
"tags": ["errors", "debugging"],
"iconUrl": "https://raw.githubusercontent.com/.../icon.svg",
"websiteUrl": "https://github.com/getsentry/sentry-mcp",
"priority": 10,
"serverConfig": {
"command": "npx",
"args": ["-y", "@sentry/mcp-server@latest"],
"env": {
"SENTRY_ACCESS_TOKEN": "${SENTRY_ACCESS_TOKEN}"
}
},
"requiredSecrets": [
{
"envVar": "SENTRY_ACCESS_TOKEN",
"displayName": "Sentry Access Token",
"description": "Create an Internal Integration token...",
"helpUrl": "https://docs.sentry.io/..."
}
],
"recommendedTools": ["search_issues", "get_issue_details"],
"allTools": ["search_issues", "get_issue_details", "create_issue", "..."]
}
```
See the [CONTRIBUTING.md](https://github.com/overcut-ai/overcut-mcp-catalog/blob/main/CONTRIBUTING.md) for full guidelines on adding new entries.
### Create entries with AI
The catalog repository ships with built-in rules for popular AI coding tools (Claude Code, Cursor, Codex, Gemini). Clone it and use your preferred agent to generate new catalog entries:
```bash theme={null}
git clone https://github.com/overcut-ai/overcut-mcp-catalog.git
```
Ask your AI agent to create a new entry. It understands the catalog schema, secret conventions, and tool discovery patterns automatically.
***
## Next Steps
* **[MCP Servers Reference](/docs/reference/mcp-servers)**: Configuration reference, manual setup, allowed tools, and runtime behavior
* **[Vault](/docs/reference/vault)**: Manage the secrets referenced by MCP server configurations
* **[Agent Run Action](/docs/workflows/agent-run)**: Execute agents with MCP tools
* **[Overcut Playbooks](/docs/quick-starts/playbooks)**: Pre-built workflows you can import and customize