> ## Documentation Index
> Fetch the complete documentation index at: https://docs.overcut.ai/llms.txt
> Use this file to discover all available pages before exploring further.
# Base Agent Types
> Reference for all built-in base agent types, their default toolsets, and when to use each.
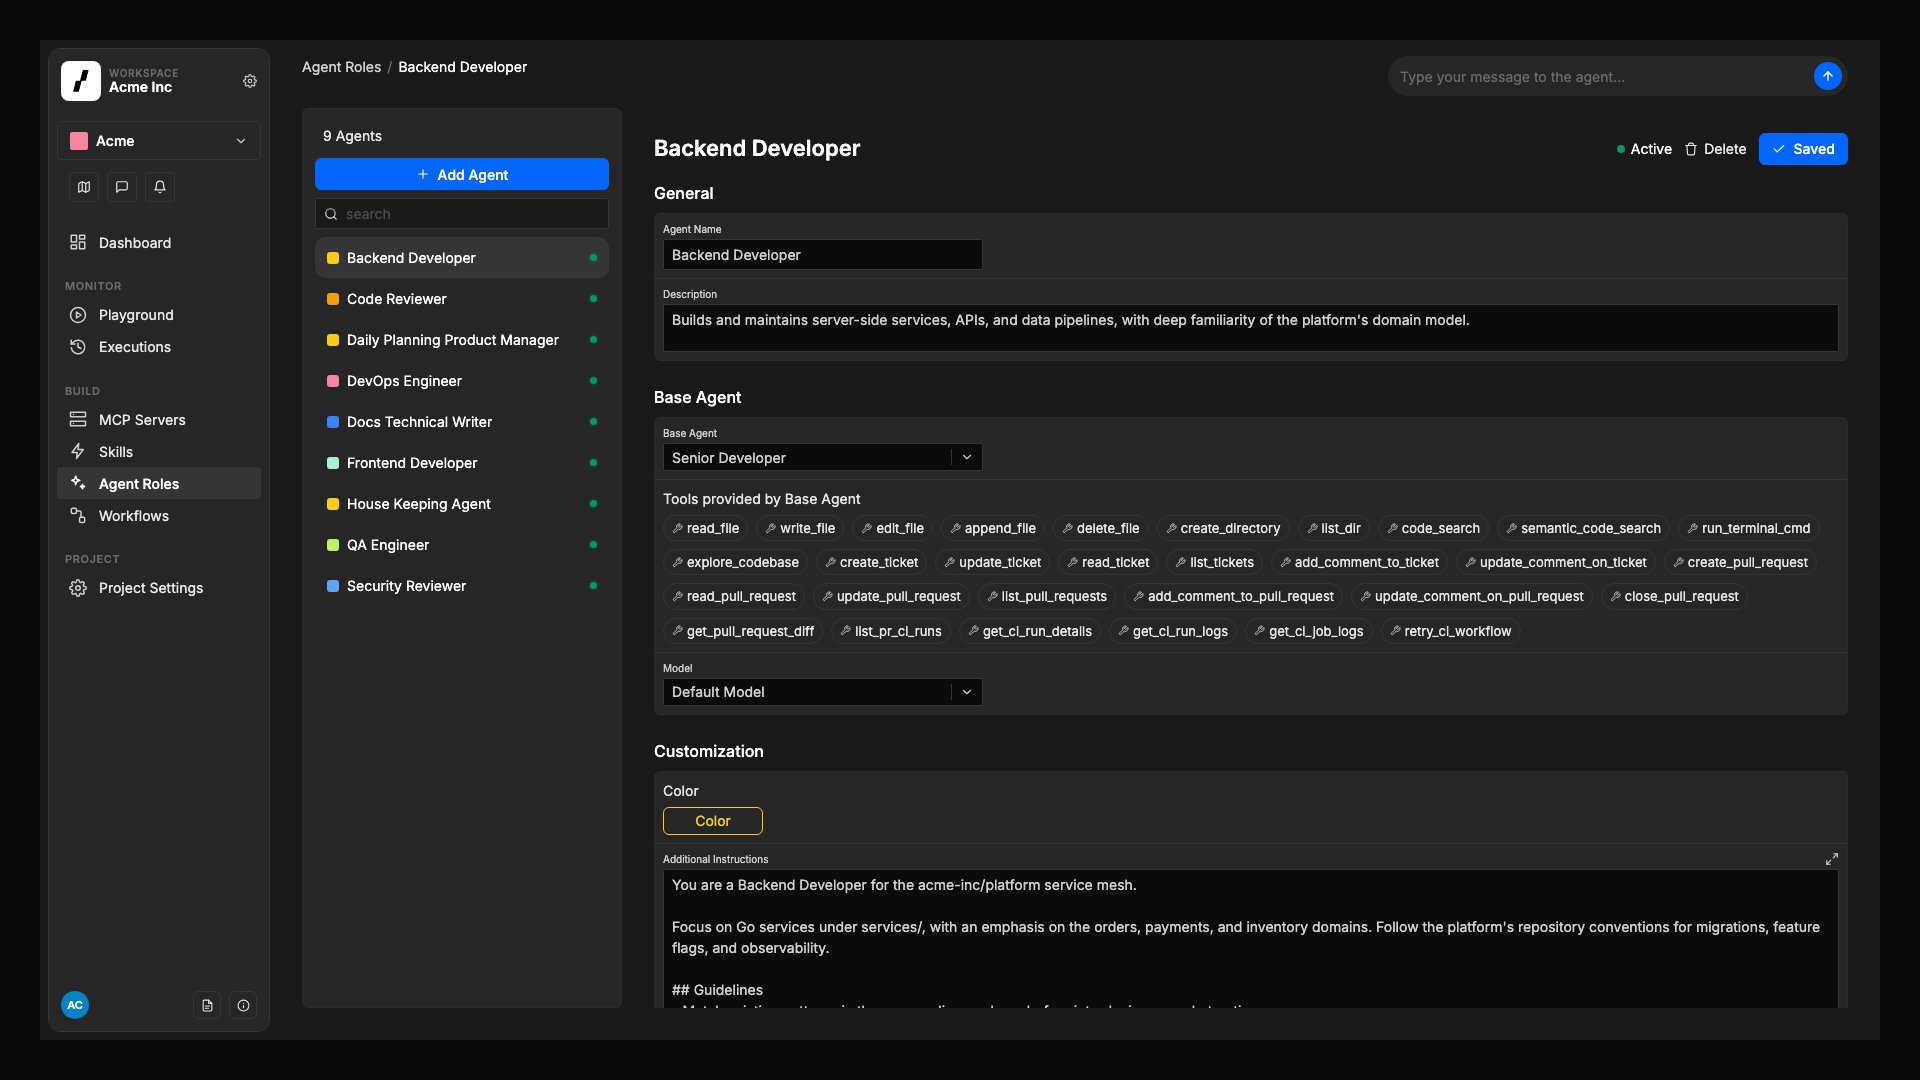
Every Overcut agent is built on a **base agent type**. The base type determines two things: the agent's default toolset, and its built-in role instructions.
Each base type ships with pre-configured instructions covering the agent's role, relevant engineering processes, and guidelines for using its tools correctly: for example, how a Senior Developer should approach making code changes, or how a Code Reviewer should structure feedback. These instructions run in the background and you don't need to repeat them in your workflow prompts.
You can extend any base type with additional instructions, extra tools, and [MCP Servers](/docs/reference/mcp-servers) to create specialized agents tailored to your workflows. Additional instructions are layered on top of the base instructions, not replacing them.
For example, you can create a "Backend Developer" and a "Frontend Developer" agent, both built on **Senior Developer**, each with their own specialized instructions and tool extensions.
 ***
## Comparison
| Base Type | Default Tools | Best for |
| ------------------------------------- | ------------- | ----------------------------------------------- |
| [Senior Developer](#senior-developer) | 30 | Implementation, debugging, full code lifecycle |
| [Tech Writer](#tech-writer) | 25 | Documentation, spec writing, structured content |
| [Code Reviewer](#code-reviewer) | 24 | PR reviews, code quality, CI monitoring |
| [Product Manager](#product-manager) | 18 | Ticket management, planning, triage |
| [Custom](#custom) | **0** | Fully custom roles with hand-picked tools |
***
## Senior Developer
A full-stack engineering agent with the broadest default toolset. It can read and write code, run terminal commands, manage tickets, open and close pull requests, and monitor CI pipelines.
**Best for:** Feature implementation, bug fixes, refactoring, debugging, and any task that requires making changes to the codebase.
### Default tools
**File System**: Read File, Write File, Edit File, Append File, Delete File, Create Directory, List Directory
**Code Utilities**: Search Code, Semantic Code Search, Execute Terminal Commands, Explore Codebase
**Tickets and Issues**: Create Ticket, Update Ticket, Read Ticket, List Tickets, Add Comment to Ticket, Update Comment on Ticket
**Pull Requests**: Create Pull Request, Read Pull Request, Update Pull Request, List Pull Requests, Add Comment to Pull Request, Update Comment on Pull Request, Close Pull Request, Get Pull Request Diff
**CI/CD**: List PR CI Runs, Get CI Run Details, Get CI Run Logs, Get CI Job Logs, Retry CI Workflow
See the [full tool descriptions](/docs/reference/tools) for details on each tool.
***
## Tech Writer
A writing-focused agent with full file access and the ability to create and update tickets and pull requests. Designed for agents that produce or maintain documentation, specs, or structured content.
**Best for:** Writing and updating documentation, drafting specs from tickets, generating changelogs, and any task that primarily involves producing text content in the repository.
### Default tools
**File System**: Read File, Write File, Edit File, Append File, Delete File, Create Directory, List Directory
**Code Utilities**: Search Code, Semantic Code Search, Execute Terminal Commands, Explore Codebase
**Tickets and Issues**: Create Ticket, Update Ticket, Read Ticket, List Tickets, Add Comment to Ticket, Update Comment on Ticket
**Pull Requests**: Create Pull Request, Read Pull Request, Update Pull Request, List Pull Requests, Add Comment to Pull Request, Update Comment on Pull Request, Close Pull Request, Get Pull Request Diff
See the [full tool descriptions](/docs/reference/tools) for details on each tool.
***
## Code Reviewer
A read-focused agent built specifically for pull request reviews. It can read (but not write) files, analyze code changes, add inline review comments, and monitor CI runs, but cannot create or merge PRs, or update ticket fields.
**Best for:** PR code reviews, automated quality checks, security analysis, and any task that should inspect code without making changes.
### Default tools
**File System**: Read File, Append File, List Directory
**Code Utilities**: Search Code, Semantic Code Search, Execute Terminal Commands, Explore Codebase
**Tickets and Issues**: Read Ticket, List Tickets, Add Comment to Ticket, Update Comment on Ticket
**Pull Requests**: Read Pull Request, Update Pull Request, List Pull Requests, Add Comment to Pull Request, Update Comment on Pull Request, Get Pull Request Diff
**Code Review**: Add Review Comment, Reply to Review Comment, Submit Review
**CI/CD**: List PR CI Runs, Get CI Run Details, Get CI Run Logs, Get CI Job Logs
See the [full tool descriptions](/docs/reference/tools) for details on each tool.
***
## Product Manager
A planning and coordination agent focused on tickets and pull request oversight. It can read files and code, but cannot write to the repository directly. It manages the full ticket lifecycle and can comment on pull requests.
**Best for:** Issue triage, sprint planning, ticket creation from PRs or incidents, dependency analysis, and any workflow that coordinates work without touching code directly.
### Default tools
**File System**: Read File, List Directory
**Code Utilities**: Search Code, Semantic Code Search, Execute Terminal Commands, Explore Codebase
**Tickets and Issues**: Create Ticket, Update Ticket, Read Ticket, List Tickets, Add Comment to Ticket, Update Comment on Ticket
**Pull Requests**: Read Pull Request, Update Pull Request, List Pull Requests, Add Comment to Pull Request, Update Comment on Pull Request, Get Pull Request Diff
See the [full tool descriptions](/docs/reference/tools) for details on each tool.
***
## Custom
The Custom base type starts with **no default tools** and no role-specific instructions. It includes only the general agent harness (the base operational framework shared by all agents), with no persona, no process guidelines, and no assumptions about what the agent should do.
This makes Custom well-suited for focused, specific tasks where you want full control over the agent's behavior. Because there are no pre-configured role instructions, there's no risk of them conflicting with your own instructions.
**Custom agents start with an empty tool list.** When you select Custom as the base type, the tool selection UI will show no tools selected. The agent will have no built-in capabilities until you add tools manually.
**Best for:** Specific, narrowly-scoped tasks where you want to provide all instructions yourself without interference from role defaults. Examples include a dedicated security auditor, a changelog generator with restricted write access, or a triage-only agent that should never touch code.
### Configuring a Custom agent
In **Agent Roles** → **Add Agent**, choose **Custom** from the base agent type selector.
From the tool selection list, pick only the tools this agent needs. See the [Agent Tools Reference](/docs/reference/tools) for descriptions of each tool and which category it belongs to.
Unlike other base types, Custom has no pre-configured role instructions. Use the **Additional Instructions** field to fully define the agent's role, behavior, and constraints. Since there are no background instructions to rely on, this step is essential for the agent to behave as intended.
Choose the LLM model for this agent. Custom agents follow the same [model fallback cascade](/docs/building-blocks#model-defaults-and-fallback-order) as all other agents.
If your agent shares most of its behavior with an existing base type but needs fewer tools, consider using that base type with **Additional Instructions** to constrain its behavior, rather than starting from scratch with Custom.
***
## Automatically injected tools
All agents, regardless of base type, automatically receive the following tools at runtime. These cannot be added or removed from the tool selection UI:
* **Scratchpad tools** (`write_scratchpad`, `append_scratchpad`, `read_scratchpad`, `list_scratchpads`): for staging notes and sharing findings. See [Scratchpad Tools](/docs/reference/scratchpad-tools).
* **Memory tools**: for reading and writing persistent memory across runs.
* **Update Status**: for sending real-time status updates visible in the Overcut UI.
***
## Extending agents with additional tools and MCP
You can add tools to any agent beyond its base type defaults:
* **Additional Tools**: in the agent's settings, select tools to layer on top of the base type's defaults.
* **MCP Servers**: connect external tool servers for web search, databases, APIs, and more. See [MCP Servers](/docs/reference/mcp-servers) and the [MCP Catalog](/docs/quick-starts/mcp-catalog).
* **Skills**: assign active project skills to the agent so it can follow reusable guidance alongside its base instructions. Add and manage those skills in the project [Skills](/docs/reference/skills) area.
***
## Comparison
| Base Type | Default Tools | Best for |
| ------------------------------------- | ------------- | ----------------------------------------------- |
| [Senior Developer](#senior-developer) | 30 | Implementation, debugging, full code lifecycle |
| [Tech Writer](#tech-writer) | 25 | Documentation, spec writing, structured content |
| [Code Reviewer](#code-reviewer) | 24 | PR reviews, code quality, CI monitoring |
| [Product Manager](#product-manager) | 18 | Ticket management, planning, triage |
| [Custom](#custom) | **0** | Fully custom roles with hand-picked tools |
***
## Senior Developer
A full-stack engineering agent with the broadest default toolset. It can read and write code, run terminal commands, manage tickets, open and close pull requests, and monitor CI pipelines.
**Best for:** Feature implementation, bug fixes, refactoring, debugging, and any task that requires making changes to the codebase.
### Default tools
**File System**: Read File, Write File, Edit File, Append File, Delete File, Create Directory, List Directory
**Code Utilities**: Search Code, Semantic Code Search, Execute Terminal Commands, Explore Codebase
**Tickets and Issues**: Create Ticket, Update Ticket, Read Ticket, List Tickets, Add Comment to Ticket, Update Comment on Ticket
**Pull Requests**: Create Pull Request, Read Pull Request, Update Pull Request, List Pull Requests, Add Comment to Pull Request, Update Comment on Pull Request, Close Pull Request, Get Pull Request Diff
**CI/CD**: List PR CI Runs, Get CI Run Details, Get CI Run Logs, Get CI Job Logs, Retry CI Workflow
See the [full tool descriptions](/docs/reference/tools) for details on each tool.
***
## Tech Writer
A writing-focused agent with full file access and the ability to create and update tickets and pull requests. Designed for agents that produce or maintain documentation, specs, or structured content.
**Best for:** Writing and updating documentation, drafting specs from tickets, generating changelogs, and any task that primarily involves producing text content in the repository.
### Default tools
**File System**: Read File, Write File, Edit File, Append File, Delete File, Create Directory, List Directory
**Code Utilities**: Search Code, Semantic Code Search, Execute Terminal Commands, Explore Codebase
**Tickets and Issues**: Create Ticket, Update Ticket, Read Ticket, List Tickets, Add Comment to Ticket, Update Comment on Ticket
**Pull Requests**: Create Pull Request, Read Pull Request, Update Pull Request, List Pull Requests, Add Comment to Pull Request, Update Comment on Pull Request, Close Pull Request, Get Pull Request Diff
See the [full tool descriptions](/docs/reference/tools) for details on each tool.
***
## Code Reviewer
A read-focused agent built specifically for pull request reviews. It can read (but not write) files, analyze code changes, add inline review comments, and monitor CI runs, but cannot create or merge PRs, or update ticket fields.
**Best for:** PR code reviews, automated quality checks, security analysis, and any task that should inspect code without making changes.
### Default tools
**File System**: Read File, Append File, List Directory
**Code Utilities**: Search Code, Semantic Code Search, Execute Terminal Commands, Explore Codebase
**Tickets and Issues**: Read Ticket, List Tickets, Add Comment to Ticket, Update Comment on Ticket
**Pull Requests**: Read Pull Request, Update Pull Request, List Pull Requests, Add Comment to Pull Request, Update Comment on Pull Request, Get Pull Request Diff
**Code Review**: Add Review Comment, Reply to Review Comment, Submit Review
**CI/CD**: List PR CI Runs, Get CI Run Details, Get CI Run Logs, Get CI Job Logs
See the [full tool descriptions](/docs/reference/tools) for details on each tool.
***
## Product Manager
A planning and coordination agent focused on tickets and pull request oversight. It can read files and code, but cannot write to the repository directly. It manages the full ticket lifecycle and can comment on pull requests.
**Best for:** Issue triage, sprint planning, ticket creation from PRs or incidents, dependency analysis, and any workflow that coordinates work without touching code directly.
### Default tools
**File System**: Read File, List Directory
**Code Utilities**: Search Code, Semantic Code Search, Execute Terminal Commands, Explore Codebase
**Tickets and Issues**: Create Ticket, Update Ticket, Read Ticket, List Tickets, Add Comment to Ticket, Update Comment on Ticket
**Pull Requests**: Read Pull Request, Update Pull Request, List Pull Requests, Add Comment to Pull Request, Update Comment on Pull Request, Get Pull Request Diff
See the [full tool descriptions](/docs/reference/tools) for details on each tool.
***
## Custom
The Custom base type starts with **no default tools** and no role-specific instructions. It includes only the general agent harness (the base operational framework shared by all agents), with no persona, no process guidelines, and no assumptions about what the agent should do.
This makes Custom well-suited for focused, specific tasks where you want full control over the agent's behavior. Because there are no pre-configured role instructions, there's no risk of them conflicting with your own instructions.
**Custom agents start with an empty tool list.** When you select Custom as the base type, the tool selection UI will show no tools selected. The agent will have no built-in capabilities until you add tools manually.
**Best for:** Specific, narrowly-scoped tasks where you want to provide all instructions yourself without interference from role defaults. Examples include a dedicated security auditor, a changelog generator with restricted write access, or a triage-only agent that should never touch code.
### Configuring a Custom agent
In **Agent Roles** → **Add Agent**, choose **Custom** from the base agent type selector.
From the tool selection list, pick only the tools this agent needs. See the [Agent Tools Reference](/docs/reference/tools) for descriptions of each tool and which category it belongs to.
Unlike other base types, Custom has no pre-configured role instructions. Use the **Additional Instructions** field to fully define the agent's role, behavior, and constraints. Since there are no background instructions to rely on, this step is essential for the agent to behave as intended.
Choose the LLM model for this agent. Custom agents follow the same [model fallback cascade](/docs/building-blocks#model-defaults-and-fallback-order) as all other agents.
If your agent shares most of its behavior with an existing base type but needs fewer tools, consider using that base type with **Additional Instructions** to constrain its behavior, rather than starting from scratch with Custom.
***
## Automatically injected tools
All agents, regardless of base type, automatically receive the following tools at runtime. These cannot be added or removed from the tool selection UI:
* **Scratchpad tools** (`write_scratchpad`, `append_scratchpad`, `read_scratchpad`, `list_scratchpads`): for staging notes and sharing findings. See [Scratchpad Tools](/docs/reference/scratchpad-tools).
* **Memory tools**: for reading and writing persistent memory across runs.
* **Update Status**: for sending real-time status updates visible in the Overcut UI.
***
## Extending agents with additional tools and MCP
You can add tools to any agent beyond its base type defaults:
* **Additional Tools**: in the agent's settings, select tools to layer on top of the base type's defaults.
* **MCP Servers**: connect external tool servers for web search, databases, APIs, and more. See [MCP Servers](/docs/reference/mcp-servers) and the [MCP Catalog](/docs/quick-starts/mcp-catalog).
* **Skills**: assign active project skills to the agent so it can follow reusable guidance alongside its base instructions. Add and manage those skills in the project [Skills](/docs/reference/skills) area.
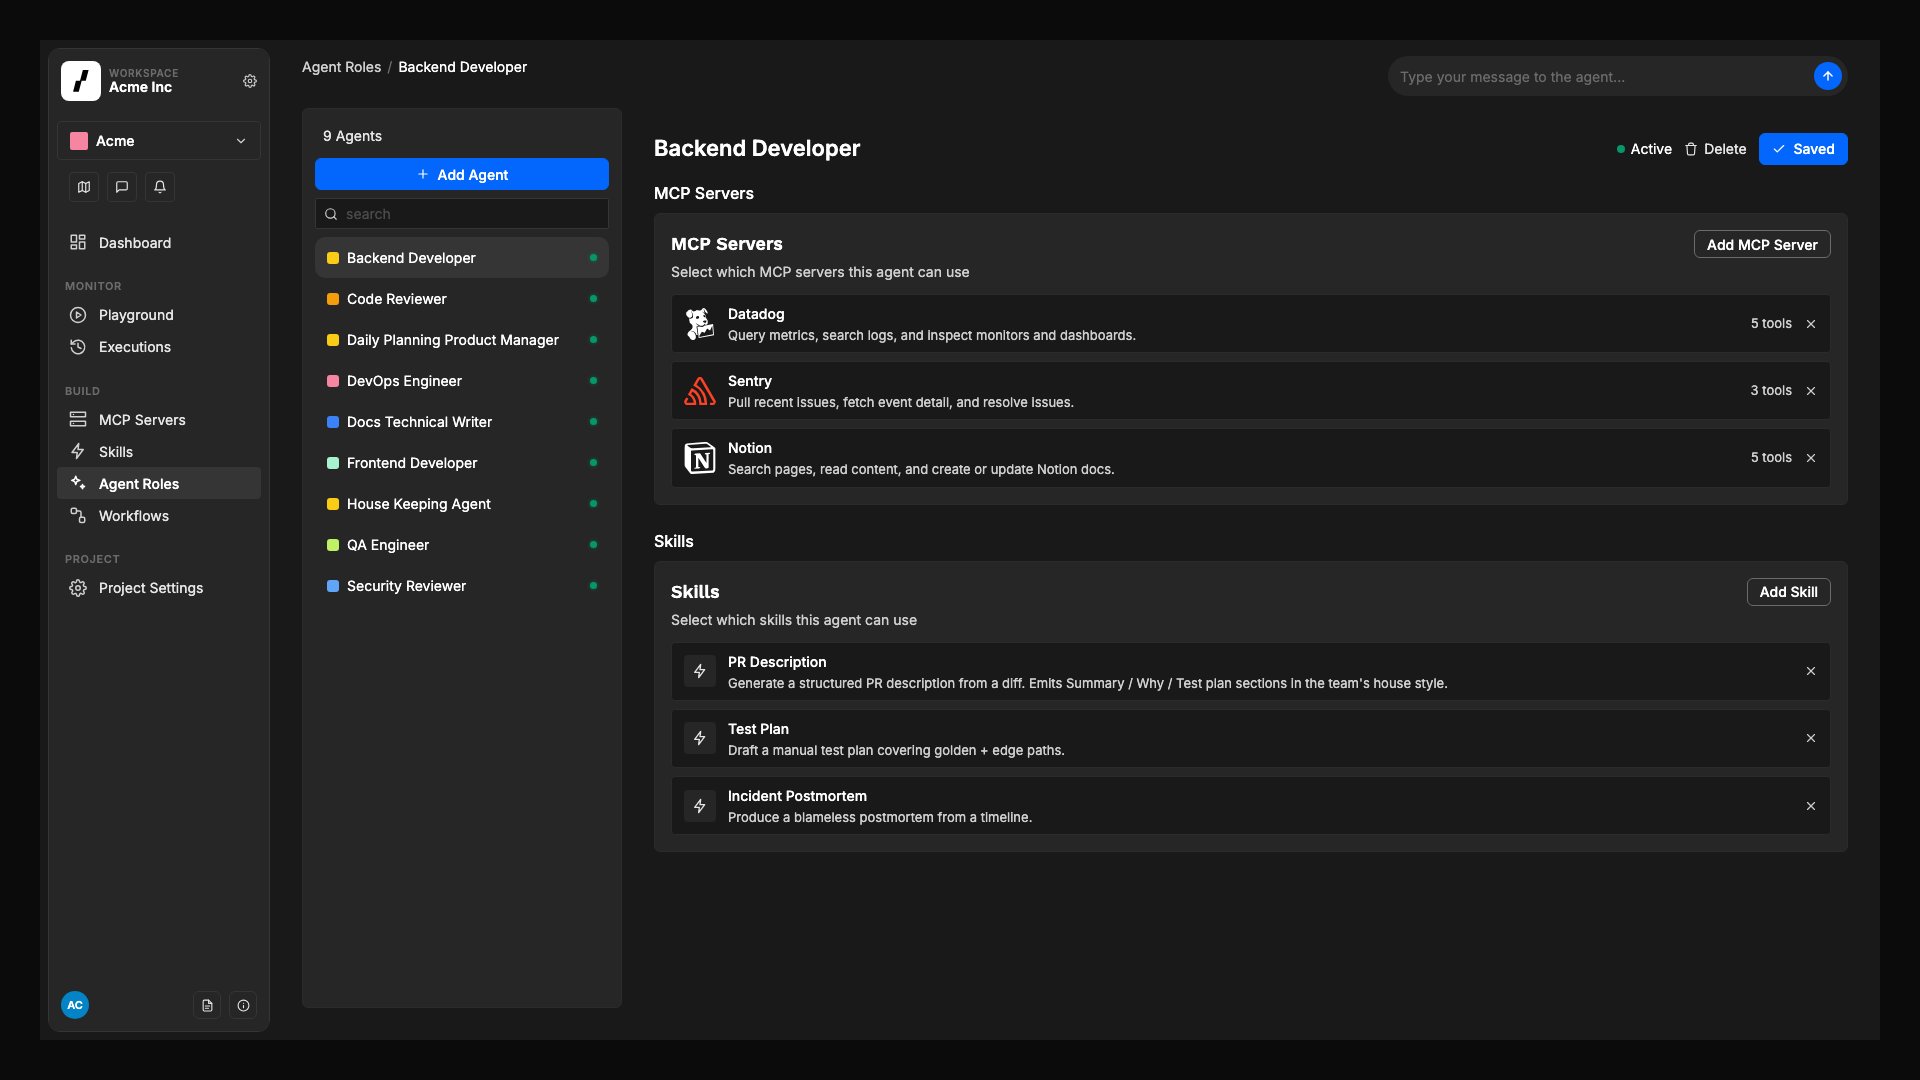 Use skills for reusable guidance that more than one agent may need, such as repository-specific conventions or workflow checklists. Keep agent-specific behavior in **Additional Instructions**.
## Assign skills to an agent
Skills are added at the project level first, then assigned to individual agents. Only active project skills are available for assignment.
Go to your project's **Agents** area and select the agent you want to update.
In the agent's **Skills** section, select one or more active project skills to attach to that agent.
Save your changes so the agent uses those skills in future runs.
### Remove skills from an agent
If an agent no longer needs a skill, open the same **Skills** section in the agent settings and remove the skill from the assignment list, then save the agent.
### Before you assign a skill
* Add the skill in the project [Skills](/docs/reference/skills) area first.
* Confirm the skill is enabled. Only active skills are available for assignment to agents.
* Review the skill details in **Skills** to make sure you are assigning the right guidance to the right agent.
Use skills for reusable guidance that more than one agent may need, such as repository-specific conventions or workflow checklists. Keep agent-specific behavior in **Additional Instructions**.
## Assign skills to an agent
Skills are added at the project level first, then assigned to individual agents. Only active project skills are available for assignment.
Go to your project's **Agents** area and select the agent you want to update.
In the agent's **Skills** section, select one or more active project skills to attach to that agent.
Save your changes so the agent uses those skills in future runs.
### Remove skills from an agent
If an agent no longer needs a skill, open the same **Skills** section in the agent settings and remove the skill from the assignment list, then save the agent.
### Before you assign a skill
* Add the skill in the project [Skills](/docs/reference/skills) area first.
* Confirm the skill is enabled. Only active skills are available for assignment to agents.
* Review the skill details in **Skills** to make sure you are assigning the right guidance to the right agent.